Friday, August 14, 2015

Cultural Work on Cypress Greens

We really got after the greens on Cypress this past week as we were closed for a couple of days to get the work done.  If you were out there playing now on them you probably don’t realize all that was done because they are very smooth and clean. 

I’ve been watching this grass, Emerald bermudagrass, since I started here in January, and like I’ve said before it is a different type of turf.  It does not produce nearly as much organic matter/thatch as the other ultras like Tifeagle, Miniverde, or what you used to have out here years ago, Champion.  Organic matter is essentially any plant growth or decomposed matter from the plant that forms below the grass in the soil.  Organic matter will accumulate to high levels if not taken care of with practices like core aerification, verticutting, topdressing, solid tine aerification, etc.  These practices either dilute or remove this material, giving the plant more room to grow and mature.  Without removal it will accumulate to the point that it becomes a sponge and your plant gets stunted and roots aren’t allowed to mature.  You become more susceptible to disease and pests as the plant is just not healthy enough to stand the pressures of weather and daily play.  Besides that, the putting quality is so poor when not maintained properly. So, the choice of Emerald is good in that regard, as you don’t have to do as much removal, but it still needs maintenance. 

Verticutting at 0"height, flush with the soil
 We removed a good size core in May when we aerified, and while looking at the profile the last few weeks I didn’t see the need to go in and remove a core at all this time.  So we changed up our cultural work to focus mostly on grain reduction and at the same time open up the canopy with a solid tine to allow for water penetration, reduce surface compaction, and allow for gas exchange.  We started with a good verticutting, 2 directions, down and back over the same pass.  It is essentially a quadruple verticut, attacking the grain from all angles.  It is almost like taking your dog to the groomer! Gotta thin out that hair (leaf blades) for a healthier hair and skin layer.  Like the hair, the grass just stacks on top of itself without proper control and when putting, the ball will move and waver from side to side.  So, the verticutting is done to thin the canopy and allow the plant to grow tighter and closer to the soil surface. 

Double cutting surface at .125" with baskets - roughly 6 baskets of clippings per green!
Lots of clippings and plants removed - good thing
 
After we blow the surface completely off, we came in with our triplex greensmower at a lower height and double cut all green surfaces. We mow down and back over the same pass to catch all leaf blades at two different angles.  This really cleaned them up.  Most people think that after greens are verticut they are unputtable for days.  That is simply not the case and at every other club I’ve been at the members actually looked forward to this process as it made the greens smoother and faster.  For you physicists out there, the biggest factor effecting ball speed is friction caused by the leaf blades.  The verticutting process removes leaf material, which essentially decreases the friction on the ball.  The only real negative to the practice is that you might see the verticut lines for a few days after, but if this practice is done frequently the lines will not affect your ball roll at all. 

View of 5 green after verticutting and mowing - some minor scalping is a good thing here

View of 3 green after verticutting and mowing
After heavy topdress we needle tine with the Toro 648 - notice small holes on tight spacing
On day 2, we came in and topdressed the greens very heavy, as you can see from the picture.  The sand, after we work it in, moves down into those verticut lines.  The sand replaces leaf blade which creates a firmer, truer surface.  The way bermudagrass grows in the summer this process has to take place every 1-2 weeks for the best possible putting.  Behind the topdressing we solid tined the greens with a 0.2” needle tine that goes down about 3” into the soil, getting below the organic layer and opening up channels for air/water to penetrate to deeper levels.  We follow behind with a double rolling of the surface to smooth it out after the solid tine, making it puttable right behind.  We drag the sand with our bunker rake machines and their broom attachments to work the sand down into the canopy.  The surface is watered 10-15 minutes after all of these processes are complete to move the sand down into the canopy and also give the soil the water it needs after a stressful series of cultural practices.
Double rolling behind the solid tine work

We opened the course again on Wednesday, and just ahead of play we sprayed a wetting agent and some timely root absorbed fertilizers on the surface and watered it all in to get the products down in the root zone where they can work.  We should get some really good response in root growth over the next month due to these practices.  We sprayed them again today with a foliar package and growth regulator.  They are in great shape at this point and will only get better from now till fall.  Lots of work done.  Crew did an outstanding job this week making it all happen. We will be doing the Pecan Course the same way on August 31 - September 1. 

Friday, August 7, 2015

New Jacobsen Equipment

I’m sure many of you have either heard us talking about the new equipment or have actually seen it out there in action, but I’d like to spend a little time letting you know about it in detail and what it will do for our course conditions.  It was very easy to tell for anyone who knows anything about our operation that we just didn’t have enough equipment to maintain such a large place up to the standard that our club desires. CBIGG listened to our concerns and came through big time and got us what we needed.  That is a very large commitment to make when you are talking about 30+ clubs.  The total amount spent across the company was over $3 million!  This will go a long way in helping us improve your experience out on the course. 

CBIGG, after careful consideration of all 3 major turf equipment brands, (Toro, Jacobsen, and John Deere) decided to go with Jacobsen.  Most of our old equipment that you are used to seeing on the course is Toro (red machines).  The Jacobsen machines are all orange so you can definitely see what is new out there.  There are some minor differences in the operation of the new machines but the crew has quickly adjusted and you will see the same quality of cut that you are used to seeing with the Toro.  The biggest differences that you will see from years’ past is the maintenance intervals have been improved to give a better cut no matter the machine or manufacturer, and the addition of more units only improves the quality and time needed to get the job done. 

In all, we will be adding 19 pieces of equipment to our fleet!  There are still some products working their way to us but all of the cutting units are here and in action – 7 cutting units, 1 sprayer, 1 tractor/loader, 1 cart path edger, 2 heavy duty trucksters, and 7 utility carts – we are still waiting on the utility carts and sprayer.  I’ll spend some time here talking about the cutting units and come back later and talk about the rest of the equipment. I put the price of each machine next to what we received just so you can see how big of an investment this is.  These units aren’t like the riding mowers you can buy at Home Depot.

Starting with our most important asset, the greens, we got two new Jacobsen Greens Kings (price - $25,000 each). They have 15 blade reels, designed to cut about twice as much grass as the standard 11 blade units of days past.  Our old greens mowers, the Toro 3250, had 14 blade reels and gave us similar results that we will see now.  These Toro units will now be used for cutting tee boxes and approach areas around the greens.  Since I have been here we have been cutting tees/apps with large fairway units, as that is all we had. This just puts unnecessary stress on our most important grass areas. So, this addition of new greens mowers will improve both greens and tees.  The Toro units were ground and new bed knives placed on them so the quality of cut is as good as new.  Big improvements will be made to these areas as you can already see if you have played recently.
 
Fairways were definitely a struggle when I arrived.  We had older units, but due to their age and the amount of hours on them only one worked at any given time.  Mowing 50 acres of fairways is just way too much to ask for one unit every week.  Even though both units were only 4-5 years old, the amount of hours placed on them gave them the real life equivalent of about 8-10 years in age, and they weren’t maintained properly.  We added 2 new Jacobsen LF570s (price - $46,000 each) to the fleet to help get the fairways mowed quicker and with better quality.  With more units at our disposal, there will be less hours placed on each machine and less wear on the blades, which is only a good thing all around. 

Roughs got a huge boost with the addition of 3 new units.  We added 2 new Jacobsen AR-522s (large 5 deck cutting units – price $43,000 each) and 1 AR-3 (smaller 3 deck unit – price $26,000 each).  I’ve worked at a number of 36 hole properties in my time and in order to get the roughs mowed once per week we needed 2 large units and 1 smaller unit per course(for about 120-150 acres of turf per course).  When I got here at Sweetwater we only had 2 large units and 1 small unit for 350 acres of turf!  Unless the machines ran 24 hours a day it just wasn’t possible to get around both courses in a week, so it took a good two weeks to get it done.  This left piles of clippings everywhere and mad golfers having to hit out of 4” tall summer bermuda grass – no fun! We now have enough cutting units to be able to take care of each course every week, which will make for a better look and quality to the turf but also a better golfing experience.  Huge improvement!

I think you will find in a short period of time that all of these new tools will drastically improve the course conditions here at Sweetwater.  There is a purpose behind every machine and why we have it in our fleet, and it is all designed to give us the best greens, tees, fairways, and roughs possible. This big $325,000 investment for Sweetwater shows that CBIGG is committed to quality and improving your experience here at the club.   

Cypress Course Aerification - August 10/11

We are into the hottest month of the year, but fall is definitely on the way!  I’m sure no one will be upset when the 100 degree days go away.  In order for us to get ready for the long fall and winter we have ahead we have one final aerification on the courses left to do.  We will be closing the Cypress Course this coming Monday and Tuesday (August 10-11) and reopening for play on Wednesday.  This will give us a chance to prepare the turf and soil for the next 8 months until our next aerification next May. 

This aerification will be a little bit different than what you saw from me last time in May.  The Emerald bermudagrass that we have on these greens just doesn’t produce the thatch/organic material that the ultradwarfs like Tifeagle, Miniverde, and Champion do – not anywhere close.  My analysis of the greens profile (the soil from 0-12” deep) is that in the 5 or so years that this grass has been on these greens very little material has accumulated and our organic matter percentages just aren’t high enough to warrant an aggressive core removal program.  That doesn’t mean that it won’t change in time, but I just don’t see the necessity in pulling cores just to pull cores.  I never thought I would say that, but Emerald is just a different grass. 

So, on the green surfaces starting Monday we will be doing a series of verticutting before any topdressing or aerification is done.  We will go two different directions, down and back over the same pass to try and remove as much grainy leaf material as we can.  This will open up the turf canopy for topdressing to work its way in.  We will double cut the greens after the surface is blown off.  As you have seen over the past month since we started verticutting weekly the ball roll actually improves and does less wobbling back and forth.  Our next step in the process is to topdress the greens heavily and then follow behind with a needle/pencil tine aerification.  It is a solid tine that is about 2/10” wide and goes down to a depth of about 2-3”.  Once this is complete we will roll and drag in the sand into the small holes and the verticut lines.  The heal time on this will be more like a few days as opposed to a couple of weeks.  This is the best thing for these greens at this time.  We will follow behind with a soil spray consisting of wetting agents and fertility to improve rooting depth and plant health. 

While we are working on greens we will also be aerifying tees and continuing our aerification of fairways.  Just like in May, we will be removing a ½” core from the tee areas and practice tees.  This is a minimally invasive process that will help water penetration and plant rooting depth on our second most important surfaces.  As many of you know, these tees are very hard and compacted, making it difficult to place a tee on the ground at times.  Consistently doing this process a couple times a year will help alleviate that issue.  We will continue aerifying fairways and pick up where we left off in May.  With rains in May we were only able to get 4-5 holes complete.  We would like to finish that process and get the entire course done once this year.  Without aerification on these heavy clay soils you just can’t get the proper plant health that is desired for great turf conditions.  The roots aren’t allowed to penetrate which stunts the top growth and doesn’t allow it to mature and spread like it should.  The core removal process has not been done on these fairways in a number of years.  On the fairways that were done in May we are already seeing great results.  This process along with monthly spray applications of wetting agent and growth regulator will allow the plant to mature and reach deeper root zones. 

We will give the Cypress Course about 3 weeks to heal and then we will be doing the Pecan Course on August 31/September 1.  This will ensure that you always have one healthy/non aerified course to play golf on. 

Thursday, May 28, 2015

Storm Damage

It has been quite a month here at the Club weather wise.  Somebody turned on the rain and we can't seem to shut it off!  On Monday night we experienced one of the heaviest rains we have had in 10+ years, receiving almost 11" of rainfall in a 10 hour period.  We were one of the hardest areas hit around town.  We have also had almost 21" of rainfall for the entire month of May, and we are at roughly 45" of rain for the year to this point.  The average YEARLY rainfall in Houston is around 45" of rain, so we are well ahead of average, and that has made for some very wet conditions on our golf courses this year and especially in the month of May. 
 
I've included some pictures to show just how bad it actually got here.  For the most part it was just a lot of standing water in many areas as we did not have too much structural damage from the storms.  There were a lot of newly made lakes!  There were a number of large and small limbs from the trees to pick up as the winds blew through here pretty hard at one point.  We also lost 3-4 trees.  Debris was everywhere after the waters receded and required some cleanup work before we were able to mow anything.
 
#1 Pecan - creek on left side of hole completely full and well out of its banks all the way across the fairway
#2 Pecan - same creek in front of tees well out of its banks and flooding most of right side of hole
#9 Pecan - creek out of it banks and water backed up to around 150-200 yard range from green, and water up into bunker in front of the green
#12/13 Pecan - left of these holes - a new lake was created, cart path completely submerged
Bunkers obviously took a serious blow and will take a lot of work and repair to get them back to where they were.  There were a number of bunkers that were underwater from the nearby flooding areas, and these are the ones with the most damage.  Any time you get moving water going through a bunker you will encounter silt contamination that can mix with the sand and cause many long term issues.  This silt will mix in with the drainage and eventually clog up the bunkers.  Our practice after any rain is to go in and skim off the dirty material and dispose of it before we rake the bunkers.  This eliminates the possibility of that silt causing long term damage.  After 11" of rain this process is obviously magnified to a much larger extent.  Normal rain might include skimming off 2-5% of the surface area of the bunker, but after this heavy event in some cases it is 100% of the surface area that is effected.  That process will take time before we can push the sand back up on the edges.  Once we are finished we will come back and add new sand to replace what we have lost. While the bunkers are in this state we ask that you play them as ground under repair until you see the sand raked. 
 
Typical bunker damage - lots of silt contamination and sand washed down off of edges
The wet conditions also make it very difficult for us to do any mowing at all.  We have been battling all month trying to get caught up but the next rainfall slows us down.  There are some areas of the courses where we haven't been able to mow roughs for 3 weeks now.  We have started mowing some areas today and will continue mowing as long as it stays dry.  We raised the heights on all of our short grass areas so that we do not excessively scalp and further damage the turf.  It will take a few mowings to get caught up and back to normal heights.  It will be a tedious process as the grass is so tall, and it will require lots of blowing to get the surface clean again. 
 
#7/8 Pecan tunnel - as was the case with all tunnels, completely full and impassable
 The tunnels are obviously a large problem here at Sweetwater when flooding occurs.  As you can see from the photo above almost every tunnel was completely full of water.  Our built in sump pumps were not enough to keep up with 11" of rain.  We were able to pump all of them down on Pecan on Wednesday and will be working on Cypress today and Friday. 
 
It is hard to recover quickly from storm situations like we have faced this month, but we will be working as hard as we can to get conditions back to where they need to be.  It will take longer than normal to get all areas back playable as this was a major rain event that only happens every 5-10 years, but we will get there.  Your patience is appreciated during this time. 


Wednesday, April 1, 2015

New Daily Pin Sheets

Just another small upgrade to the arsenal - we are rolling out new pin sheets starting today, April 1st.  No, it is not an April Fool’s Day joke, it is for real!  This system will give you much more accurate yardage as you hit your approach shots into the green.  The old 1,2,3 system only gave you a guesstimate, and depending on the size of the green and where the pin was located you would have to make a guess between 10-15 yards.  Sometimes, that is the difference of a club or two for most folks.  I know what you’re saying, “Most players don’t even know which direction they are going to hit it let alone need the exact yardage”.  Well that may be true, but at least with the exact yardage you can’t make an excuse now about that. You’ll have to get with Bob and Jim to fix the rest of your game!


Pin Sheet for Pecan - each hole has a depth of green with a plus/minus number in the center telling you distance from center of green
These new pin sheets will be printed daily based on what day of the month it is.  There are 31 completely different pin sheets, all with randomly selected hole placements based on depths of the green.  There is a very good mixture of front, back, and middle pin locations for each day.  These pin sheets will be located on your golf carts as you go out to play.  We will also get a stack of them to the starter house in case you lose one or didn’t receive one. 

For those of you that don’t have range/yardage finders this will give you very accurate information to help you select the right club.  All you need to do is check the nearest sprinkler head for the yardage you are from the center of the green and then add or subtract the day's hole location to get your exact yardage.  For those of you with yardage finders that may not need these sheets, we still have the flag sticks with the prisms inside so you can easily get your number by shooting the flagstick.  My goal is to make sure it wasn’t me that screwed up your shot!  We will continue to do everything we can to maximize your experience here at Sweetwater.  Please let me know if you have any questions.   

Tuesday, March 17, 2015

Cart Boundary Stake System

Have you ever noticed around greens or tee boxes that there are areas where there just isn’t any grass?  Maybe next to where everybody parks to walk up to the green? Or where everyone drives onto the fairway from their tee shot?  There is a solution for these cart stressed areas.  We have been working in the shop during the inclement weather times getting this stake system fabricated and we are now ready to put it in action.
4x4x18" posts - one of them placed near cart path and other on other side of fairway
 As you come out to play the courses this week you will notice these large wood stained 4x4 posts (18" tall) with either blue or red painted on the top on all par 4s and 5s on both courses.  The blue ones will be on the Cypress Course to go along with the blue flags, and the red ones will be on the Pecan Course, as it has red flags.  These stakes will be indicators for all carts to let you know where to enter and where to exit each hole with your cart.  There will be one placed just after the tee boxes and two of them up near the green on each side of the hole.  From the tee box you will need to keep your carts on the path until you drive PAST the marker and then you are free to drive anywhere on the hole until you get to the two stakes near the approach to the green, at which point you need to get back on the cart path BEFORE PASSING them.  Due to the shortness of the par 3 holes we are going to designate them Cart Path Only at all times, and there will not be any markers. 
 
You can see from these simple drawing diagrams what is the correct and incorrect ways to drive near the stakes. 

Past tee boxes - one stake near cart path - you can see from the arrows where you are allowed to drive - always go past the stake before entering fairway - imaginary dotted line horizontally from the stake and cart path

Near green - imaginary dotted line across both stakes showing where you are not allowed to drive

There has always been a large number of members at my previous clubs who pleaded with me to get this done to help the turfgrass around the high profile areas (tees and greens), and it works great provided we get membership buy-in.  We will rotate the location of these markers on a daily basis so we can spread out the traffic, but they will always be roughly 25-100 yards from the green.  This will allow the roughs around the tees and greens to grow without the additional stress.  It will give them a fighting chance to be the best looking grass on the course, which is what you would want and expect around your best areas.  We also have the smaller 8" wooden stakes along the cart paths near greens and tees protecting areas where carts park to walk up to these areas. 

Now that these markers are up and the stress is taken off, we will begin the recovery and healing process around these areas.  We will do some solid tine aerification to relieve the compaction that heavy cart traffic can cause, and then follow up with some needed fertility and deep watering to get the plant back to recovery.  It is work that you won’t really notice as a golfer, but the benefits will be very nice. 

We want to make your round as enjoyable as we can from an ease of access perspective as well as a quality of conditions perspective.  We feel these new guidelines will fit right in with both of those.  We can’t do it without the help of our membership.  We will also make announcements prior to golf outings letting them know the cart rules as there is a good bit of traffic from those groups.  Thank you for your understanding and help in spreading the word.  In order to make these courses the best they can be it is going to take more than just effort on the course maintenance staff to get it done - everyone can participate and help in the cause by leaving the course in better shape then you found it. 


Monday, March 9, 2015

New Golf Course Flags

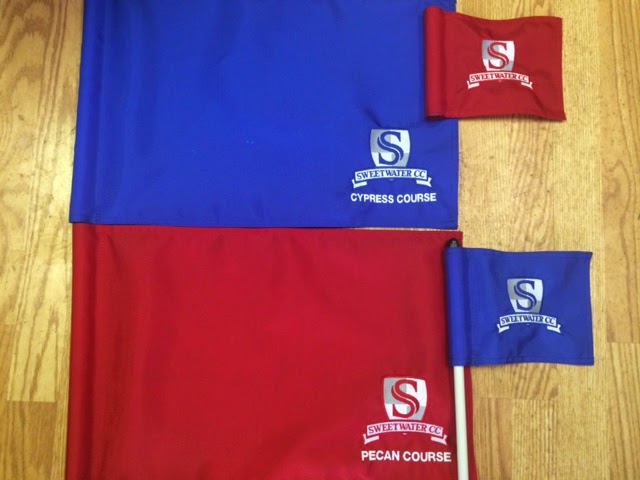
One nice little change that you will see this week on both golf courses – a different look to the flags on each hole.  We went with a more classic style look and a little differentiation between the two courses. You will see blue flags on the Cypress Course and red flags over on the Pecan Course.  Not all that earth shattering, but just a little something to put some separation between the two.  It even says the name of the course embroidered on each flag underneath the embroidered logo.  We also made little putting green flags in blue and red with the course logo instead of the plain white flags.  We will continue to use the white flag sticks with yardage reflector.  Just another small step towards improving your experience here at Sweetwater. 

New Flags with course name below logo


New Tee Markers and Cart Path Stakes

The weather hasn’t exactly cooperated much with us over the last month, but that isn’t slowing us down from getting ready for spring.  There are a number of projects that we have been working on and cleaning up some of the course accessories is big on our list.  One of my first impressions when I started a month ago was that a lot of the course accessories (tee markers, stakes, rope, flags, ball washers, flags, etc.) didn’t match or have any theme to them.  Sometimes the accessories on a golf course can make or break you, and leave the member or guest with a bad impression of the place.  I’ve always tried for a simplistic, classic look with course accessories – you don’t want the accessory to overpower the course, let the architecture do the job. 

Tee markers were in need of a change, as it had been a little while since the last ones were done.  We decided the best thing to do for now was recreate what had been used, but give it an upgrade so it would last longer.  All landscape timbers were angle cut, sanded, stained, and painted for completion.  The stain waterproofs the wood to prevent moisture damage, and also has a protective coating to prevent mildew buildup which was an issue with the old ones.  It should also give it a new, fresh look that lasts much longer.  We will redo tee markers every winter.  We put the new ones out this past weekend.
 

Sanding down the tee markers for smoothness
 
Staining them for water and mildew prevention
 
Painting the edges for each tee box location
 
Blue tee markers in place

One other thing that I saw as an opportunity to spruce up the place and improve grass conditions was to make new wear area stakes.  With any golf course that uses golf carts for the players you are always going to have areas where the grass gets worn down.  I’m sure you saw a bunch of the little green and white stakes all over the place that prevented you from driving in certain areas.  I have used those at my previous courses, but I thought this place might be better suited to stay with the wood theme.  We took the same material we use for tee markers and cut them straight at 8” and added a 3/8” galvanized stake to keep them in the ground.  These stakes were also sanded and stained with the same material used for tee markers.  We will use these around tees, greens, and high traffic spots around cart paths.  I would prefer to never use any type of stake, but I feel it is necessary if you want to have grass in all areas.  We need the help of the membership to obey the areas where there are stakes and not drive through them.  We will straighten these daily and move them around to areas of need as we see fit.  We started putting these out last week. 

Staining wear area stakes
Placement of wear area stakes along cart path near a green where carts park

Once these are complete we will move on to a few other things, including painting all hole signs and ball washers. We will also create a boundary system around tees and greens to try and minimize unnecessary traffic around these important areas to improve the aesthetics and playability of some of our most important grass areas.  I’ll talk about this more in depth next week once the stakes are ready to go.  They are in addition to the little stakes used around cart paths. I’ll talk about their importance and what we will do agronomically to get grass back in a lot of these areas.   

Friday, February 20, 2015

Spring Home Lawn Care

Spring time is a crucial time for golf course managers to make sure they get their grasses started off on the right foot.  It is also just as crucial for all of us homeowners if you want that lawn that all of your neighbors are envious of.  There are many steps you can take to ensure that you are doing everything to give it that advantage.

As soil temps start to warm up and the amount of sunlight in the day starts to increase the grass is going to want to green up.  We need to take some steps to maximize both the amount of light that reaches the soil and the temperature of the soil.  The more light that hits the soil, the more heat that will reach the soil – makes sense.  The biggest step we take in the golf industry to maximize this is to scalp off the excess dead, dormant material (brown grass) to allow for new growth and more sunlight.  That brown stuff can get pretty thick, especially with the harsh winters we have had as of late.  If left alone it will just shade out the soil and slightly delay that green up effect.  The scalping is a one-time deal – do not leave the mowing height at that low height after this is done.  Typically, I will lower our mowing heights from 25-50% below the height of cut that you use during the growing season – it just depends on how thick your turf is.  Don’t go from 3” height down to dirt level – that won’t help anything.  If you mow your St. Augustine at 2.5”, I would lower the height to around 1.5-1.75” and start there.  You can always lower the height again if you feel it needs to be lower.  Just remember you’re not looking to take off all of the brown material, you’re just trying to give the plant some room to grow.  You also want to do this before the grass really gets growing so you are removing more dead material then viable, green material.  I always shoot for around the first of March, especially if trees are greening up and budding. 

One important thing most homeowners forget is to take care of your machines that maintain your grass.  I know I’m nothing as a superintendent without my equipment staff.  It might be the most critical part of turf maintenance.  The biggest thing is keeping a sharp blade.  The mowing process is stressful to turf, even with a sharp blade, don’t make it worse by using a blade that is as dull as your finger.  I see so many homeowners that end up with weedy, thin yards, simply because they mow to low, don’t mow often enough, and mow with super dull blades.  Might as well just put rock in your yard and go desert style, because you ain’t growing grass!!  It’s pretty simple – one bolt to remove the blade, take it off and use your bench grinder to sharpen the blade only on the angled side.  If you need help with this just bring it to me and I’ll show you here at our shop.  If you don’t want to sharpen it, go buy a new one.  Trust me, the $20 to get one will pay for itself in turf quality.  I like to sharpen mine at least 2-3 times per year. Use the winter time, when you aren’t using the mower to go through the rest of the machine – change the oil and air filter, pressure wash it, etc.  Get it in prime condition because you know once the summer comes you won’t have time for that. 

After your grass gets a nice scalp down and is ready for growth this is a good time to get your spring preemerge and fertilizer out to protect it from spring weeds and give it the nutrients it needs to get growing out of dormancy.  Scott’s Bonus S is a great product and one that I use at home.  They make it easy for homeowners.  It does have some post emergent effects on weeds (meaning it will kill weeds that are already there), but it is mostly used to help prevent weeds from coming up. Read the label carefully before application!! If you don’t get the product out evenly you might as well not even use it.  Get it watered in and washed down to the soil and off the leaf blade.  You can time it with an upcoming rain (although not a heavy washout type rain). 

Taking these steps will help ensure that your lawn gets the advantage it needs to be lush and green this spring/summer.  For those of you that have someone take care of your lawn, don’t be afraid to ask these same questions to the guy in charge.  Trust me, they will take whatever short cut they can to maximize their profit and they may not do all of these things, especially if you as the homeowner don’t know yourself what needs to be done.  If you have any questions about this part of lawn maintenance or any other please don’t hesitate to give me a call or stop by.  I’m here to help!!

Tuesday, February 17, 2015

Spring Preparation

Soil temps will be warming up soon and with that brings green grass.  With the air temps in the 70s over the last few weeks you can already start to see some leaf greenup, although we are a long way from the plant actually growing actively.  Our goals at this time are to condition the surfaces to be ready and primed for the spring.  There are a number of steps to take to get there. 

Closeup look at the blades that penetrate the ground
First, in order to relieve compaction that has accumulated over the late summer – winter and to promote spring root growth and development, we will be slicing and solid tine aerifying the roughs and key walk up areas.  With all of the cart traffic in the roughs over the winter this is a much needed step towards keeping our roughs nice and full every year going forward.  The slicing device that we use is called an Aerway (tractor mounted slicer) and it creates a 4-5” slit on the surface and goes down about 4-6” in the ground.  This slicing action opens up the canopy for water infiltration and fractures the ground to promote air movement to allow for deeper root growth and healthier turf.  This is a perfect time of the year for this action.  Even though the grass or top portion of the plant is not growing yet, the temps are in perfect range for root growth.  Around key areas where we get the most traffic, like green surrounds and walk ups to greens and tees, we will be using our solid tine fairway aerifier, in addition to the Aerway, to get a little more relief.  This process is not invasive at all and can be played on right behind.

The look of the grass after process is complete
Second, we will follow these cultural processes with our annual scalp down.  We will take the roughs down from their usual 2” height to roughly 1.25-1.5” to remove all of the dead/brown material.  This action allows for sunlight down to the soil and gives the new grass plenty of room to grow uninhibited.  Allowing more sunlight to the soil will actually increase the soil temperature as there is less material to shade it.  The mowing behind the slicing will help smooth out the slits and give the surface a nice clean appearance.  If we can start with a clean slate for the spring it will make our growing season easier and allow for better results.  We will try to complete these tasks in the month of February, weather permitting. We have already started the process on the Pecan Course, and should have it wrapped up by the end of the week so we can start Cypress next week. 
Scalping down the turf behind to smooth out surface and remove dead brown material

Lastly, all of the processes are done ahead of time to get ready for the spring pre-emerge and fertilization of all grass surfaces during the middle of March.  As you know, a pre-emerge is designed to provide a barrier or barricade for weed growth on the soil surface.  Slicing the ground or any surface disruption can negate the effects of this, so we go ahead and get all of that done beforehand for the best results.  The fertilizer will give the plant the much needed nutrients that it needs for new development. 

We are also busy trying to finish up a number of winter projects.  There are a number of dead trees that we have removed and will continue to remove as well as the continuation of trimming trees for better tree and turf health. We are also working on some small details that you should start noticing, like edging sprinkler heads and sprucing up the practice area experience.  We want to get most of the projects wrapped up before the Spring so when the grass starts growing we can be ready to keep up with it.   

We look forward to a great 2015!  I will be communicating with you a lot throughout the year, so if I didn’t get to all of the topics out there, I will very soon. As always, if you have any questions or comments about the courses please feel free to get in touch with me.  We are always looking to do our part to improve your experience. 

Wednesday, February 11, 2015

Introduction

I hope this is one of many letters that I will be writing you guys over the coming years.  My name is Randy Samoff, and I’m the new Golf Course Superintendent here at Sweetwater.  I am extremely excited to be here at this awesome club.  I’m a native Houstonian, growing up in Baytown, and I’m also a graduate of Texas A&M.  I have a lot of experience in the Houston area, spending a total of 16 years at clubs like Champions, Redstone, and The Woodlands.  I’m excited to get the opportunity to provide conditions that you will all be proud of. 

I fully believe that communication is a key and integral part of my job and I will be doing a lot of it with you guys through various media once I get set up (look for more info in the next month).  I will be writing articles like this on a monthly basis that will be included in the newsletter and will have information relative to upcoming projects and key issues.  Lastly, you will be able to follow me on a daily basis on Twitter – I’ll get a new account set up soon.  Twitter is a great, quick way to get small bits of information and pics out so you can see what we do on a daily basis.  I’m also free and open to the good old face to face conversation any time I’m needed. 

You have two great golf courses here at Sweetwater, and both seem to be in great shape at this time of year.  Like any course, there are issues that need attention (like cart paths), but for the most part the facility is in great shape – it just needs some new attention to detail.  My objective every place I have been is to maximize the given resources and make the facility as good as it possibly can be.  I do see a number of opportunities for improvements that we will be making in the 2015 year.  My first focus will be on getting the programs and schedules in place that will allow us to provide top notch conditions.  A lot of this is in the way we, as a maintenance staff, go about our daily tasks.  This will take some training and education with our crews and the membership.   

Greens are obviously the #1 issue at any golf course, and for the facility to be a success the greens have to be really good.  You currently have a very good stand of Emerald bermudagrass.  I’ve spent my first week on the job studying the greens and trying to learn the patterns of the crew to see where any possible issues might arise.  Most times when areas on greens fail there are more than one cause, and a lot of times there are many, many causes (causes can include drainage, soil structure, shade, moisture, chemical/fertilizer inputs, unlevel surface, excessive mechanical stress, air movement, compaction, temperature, and many more).  We all have certain tolerances as humans and when faced with too many issues or stresses we too can fail or breakdown.  Grass is no different.  Fortunately, there don’t seem to be that many issues currently hurting us.  You will see a number of changes that we will implement this year to improve the putting experience and make them even better than they have been. 

As far as the rest of the course goes and what you can expect from me, I will bring a new focus on the conditioning of the golf courses, keeping the priority always on how well they are playing.  Quality of cut is a huge issue that my crews have always strived for – grass has to be cut uniformly to play uniformly.  Cleanliness will also be a huge part of the operation – all playing surfaces will be blown as they are mowed and all areas will be trash and clutter free.  I have a simplistic/classic approach to mowing patterns - I don’t try to enhance my efforts with pretty striping, I like to put the emphasis on the golf and the architecture.  I also like a sharp edge – so look for a crisp, clean look to many of the courses features.  Firm and fast is the name of the game in my book, so expect us to focus on moisture management with the goal of giving the plant the right amount of moisture but nothing more in excess. 

Another key feature of my typical letters to the membership is some advice on your own home lawns as a lot of the practices we do on the golf course can easily transfer over to the home.  I’ll try to touch on subjects that are relative during the given time of the year. Believe me - I see a lot of mistakes on home lawns that can easily be avoided!

I can’t wait to get started earning your trust.  We will make you proud.  I look forward to meeting all of you in the coming months.  Please feel free at any time to give me a call, email, or stop by and see us.